La classe Java GridLayout est utilisée pour organiser les composants dans une grille rectangulaire. Un composant est affiché dans chaque rectangle.
Constructeurs de la classe GridLayout
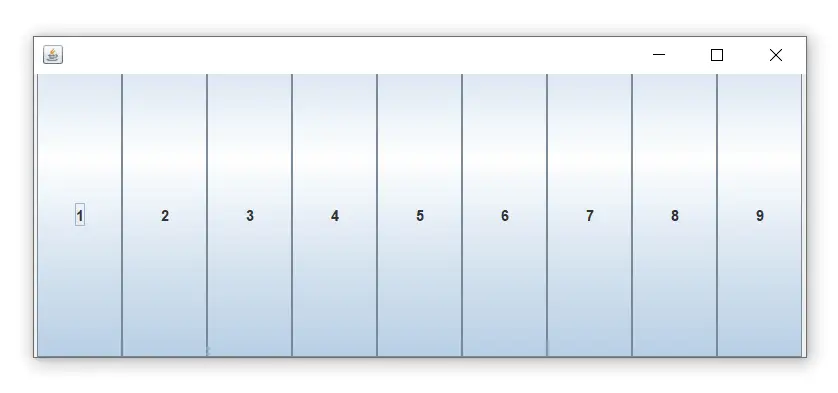
Exemple de classe GridLayout : utilisation du constructeur GridLayout()
Le constructeur GridLayout() crée une seule ligne. L'exemple suivant montre l'utilisation du constructeur sans paramètre.
tests de compatibilité
Nom de fichier: GridLayoutExample.java
// import statements import java.awt.*; import javax.swing.*; public class GridLayoutExample { JFrame frameObj; // constructor GridLayoutExample() { frameObj = new JFrame(); // creating 9 buttons JButton btn1 = new JButton('1'); JButton btn2 = new JButton('2'); JButton btn3 = new JButton('3'); JButton btn4 = new JButton('4'); JButton btn5 = new JButton('5'); JButton btn6 = new JButton('6'); JButton btn7 = new JButton('7'); JButton btn8 = new JButton('8'); JButton btn9 = new JButton('9'); // adding buttons to the frame // since, we are using the parameterless constructor, therfore; // the number of columns is equal to the number of buttons we // are adding to the frame. The row count remains one. frameObj.add(btn1); frameObj.add(btn2); frameObj.add(btn3); frameObj.add(btn4); frameObj.add(btn5); frameObj.add(btn6); frameObj.add(btn7); frameObj.add(btn8); frameObj.add(btn9); // setting the grid layout using the parameterless constructor frameObj.setLayout(new GridLayout()); frameObj.setSize(300, 300); frameObj.setVisible(true); } // main method public static void main(String argvs[]) { new GridLayoutExample(); } } Sortir:
Exemple de classe GridLayout : utilisation du constructeur GridLayout (int rows, int columns)
Nom de fichier: MyGridLayout.java
import java.awt.*; import javax.swing.*; public class MyGridLayout{ JFrame f; MyGridLayout(){ f=new JFrame(); JButton b1=new JButton('1'); JButton b2=new JButton('2'); JButton b3=new JButton('3'); JButton b4=new JButton('4'); JButton b5=new JButton('5'); JButton b6=new JButton('6'); JButton b7=new JButton('7'); JButton b8=new JButton('8'); JButton b9=new JButton('9'); // adding buttons to the frame f.add(b1); f.add(b2); f.add(b3); f.add(b4); f.add(b5); f.add(b6); f.add(b7); f.add(b8); f.add(b9); // setting grid layout of 3 rows and 3 columns f.setLayout(new GridLayout(3,3)); f.setSize(300,300); f.setVisible(true); } public static void main(String[] args) { new MyGridLayout(); } } Sortir:
téléchargez cet exempleExemple de classe GridLayout : utilisation du constructeur GridLayout (int rows, int columns, int hgap, int vgap)
L'exemple suivant insère des espaces horizontaux et verticaux entre les boutons à l'aide du constructeur paramétré GridLayout (int rows, int columns, int hgap, int vgap).
Nom de fichier: GridLayoutExample1.java
annuler le dernier commit
// import statements import java.awt.*; import javax.swing.*; public class GridLayoutExample1 { JFrame frameObj; // constructor GridLayoutExample1() { frameObj = new JFrame(); // creating 9 buttons JButton btn1 = new JButton('1'); JButton btn2 = new JButton('2'); JButton btn3 = new JButton('3'); JButton btn4 = new JButton('4'); JButton btn5 = new JButton('5'); JButton btn6 = new JButton('6'); JButton btn7 = new JButton('7'); JButton btn8 = new JButton('8'); JButton btn9 = new JButton('9'); // adding buttons to the frame // since, we are using the parameterless constructor, therefore; // the number of columns is equal to the number of buttons we // are adding to the frame. The row count remains one. frameObj.add(btn1); frameObj.add(btn2); frameObj.add(btn3); frameObj.add(btn4); frameObj.add(btn5); frameObj.add(btn6); frameObj.add(btn7); frameObj.add(btn8); frameObj.add(btn9); // setting the grid layout // a 3 * 3 grid is created with the horizontal gap 20 // and vertical gap 25 frameObj.setLayout(new GridLayout(3, 3, 20, 25)); frameObj.setSize(300, 300); frameObj.setVisible(true); } // main method public static void main(String argvs[]) { new GridLayoutExample(); } } Sortir:
